Thursday, April 23, 2015

Stars in the Nest

I'm happy to report that things are better here in the Magpie's Nest. So much so that I've been able to turn that mess of Ohio Stars (previous post) into a flimsy!

The first step was to stack the 12" stars in three columns:


My thinking at this point was to then stack the 9" stars between these columns. I knew the lengths would differ but that's a small barrier to get over. Then it dawned on me that the 9" columns could function as outer borders instead, and likely be more effective that way.


After I'd sewn the blocks into their respective columns (some a lot of rearranging of the stars was required!) I could see that this would be a better approach.


It boiled down to finding something appropriate to use for the sashing.


Now I had an almost-square flimsy. I really prefer rectangular quilts for wrapping up in or napping under so the next question was, which dimension to make bigger, width or height?

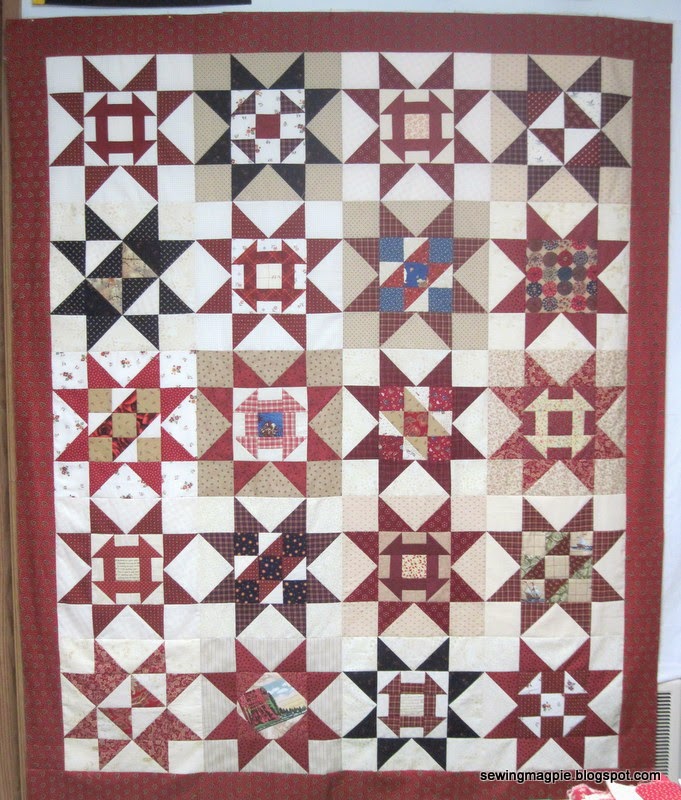
I went with width. It was a simple decision really. Another vertical sash on each end and then border strips would do the job.

71" wide x 60" high
The print I used for the outer borders also appears in several of the blocks. It was necessary to do some piecing to get the length I needed for both sides. I was able to line up the stripe in the print on the right side but couldn't manage it on the left end. Out of the yardage I began with I have only two little patches of that print left. One is about 3.5" x 5" and the other is about three inches square!

Now the challenge will be to come up with a back for this future quilt. I think I've about used up the biggest pieces of yardage in my stash from this era. If a good sale comes up in the near future I may take the easy way out and just buy what's required in something neutral.

Now, what next? ;- )


Monday, April 20, 2015

Helping Hands

It's time to check in with Hands2Help. To be honest, I haven't been working on my latest quilt for that specific challenge. I sewed the blocks into columns but didn't have the wherewithal to deal with creating the vertical sashes.


I thought I had a more recent picture too! Oh well. Since completing the Rusty Stars top (see previous post) I've been playing with the leftovers from that project.


There were a few blocks that didn't make it into the final flimsy.There was also more fabric leftover than I would have thought there could be. I started cutting patches for Ohio Stars, almost without thinking about it.


I was so preoccupied with these prints that I didn't make any new purple blocks for the Rainbow Scrap Challenge this week.


That white on purple Shoo-fly you see on the lower right side of my design wall is a friendship block I received from a member of my local guild. Back in October it was my turn to put in my request. I handed out batik patches for the members to use as background, asking them to simply use a white-on-white print for a six inch Shoo-fly or Friendship Star block. They have until October of this year to fulfill my request, then I get to put the blocks together. :- )

So now I have a whole new set of rusty stars on my design wall. I'm thinking they will become a sister quilt to the quilt in the previous post. I tried to keep the blocks in that first top more masculine in tone. With this set I've allowed the floral prints to take over. It would be lovely to get the blocks set into a top this week. I have a mix of 12" and 9" blocks though, and I'm having a hard time figuring out how to make them all play together in one top (without traditional sashing). The last few days have been pretty challenging, mentally and emotionally. Nothing out-of-the-ordinary bad, just the cumulative effect of ongoing health issues. I'd appreciate any good thoughts, vibrations, or prayers you care to send my way. With your help I'll have something spectacular to show later this week!

Tuesday, April 14, 2015

Rusty Stars

Two weeks ago I started turning a set of scrappy 6" blocks from my Parts Department into 12" Sawtooth stars for a new quilt for a child in foster care. You can see the blocks I started with in this post. Late last week I finished the flimsy ~ hurray! Let's see if I can give you a succinct recap of the process...

In that first post there were only three 12" blocks. My goal was 20. I'd started with about a dozen 6" blocks to turn into stars, and over the course of making the remaining 17 blocks I also created new 6" blocks to turn into stars. It wasn't long before I had this on the design wall:


By this time I had become worried about the top being boring with such a tightly controlled palette, thus the infusion of a few select blues.

Once I had 20 blocks on the wall in a layout I was happy with I had to decide whether or not to add borders. By themselves the blocks only measured 48" x 60." That felt just a tad small so I auditioned a couple of potential border prints.

My first option was to frame the top with one of the light background prints before putting on a rusty border.


The second option was to eliminate the frame and just go with a single border.


I played with various border widths while I had the yardage pieces up there too. I really wasn't sure which option would win out until I put the potential border fabrics on the wall with the blocks. Then it became an easy choice. And a fairly easy finish!


These are the Parts Dept. blocks I had leftover:


The blue Hole in the Barn Door block was made during construction of the flimsy. The Broken Dishes block next to it may have been as well, I don't precisely remember now.

I used a handful of prints from my early quilt making days to make a back for this top. Didn't get a picture of it though. Guess you'll have to wait and see that when I get the sandwich back from being quilted!


Saturday, April 11, 2015

Purple Scrap Eaters

When the color was announced for the RSC for April I immediately cut purple remnants into patches for my 12" Ohio Stars. That was very helpful when I found myself unable to hand sew for several days. I used some of the yellow left over from March for this one:


I made these three blocks out of one fat quarter and there's still a bit left to cut up for 6" blocks!

oops! I cut off the star points with the camera this time!


They look much better up close than from a distance.


I wasn't able to do any sewing of any kind for most of this week. Fortunately my arm is feeling better now. This is what I've made in the last two days:


Before the tulips are all gone from the fields I had to get some in purple. And now I'll have to find some more purple scraps or remnants to play with too!


I'm linking up with all the other scrappers. Hopefully I'll get round to their blogs this weekend; I didn't make it last weekend.


Tuesday, April 7, 2015

Paying the Price

I was a bad girl over the weekend. I went into our local Hobby Lobby late last week for something specific. Of course I found lots of other enticing things while I was there. One of them was another pre-finished coin or credit card case to needlepoint. I hadn't stitched one of those up in a long time. Since my shoulder injury last fall I haven't done much hand work at all. The bug bit hard when I brought that needlepoint kit home. I sat and stitched almost continuously all weekend. Guess who's having to pay the piper now? Yup, that would be me.

This is the kit I bought. If you look carefully you'll be able to see that all I have left to stitch are two corners. There are a few details that also need to be added with the black floss.


So this is what my work table currently looks like:


You can see that I've also been working on a new needle book cover. There was an influx of beads into my Nest recently too.Like I said, the handwork bug bit hard!

Here's a better look at what I've done so far on the needle book cover.


To create the cover of my needle books I foundation piece scraps onto a strip of Warm & Natural batting (mostly as a way to use up scraps of batting too), then embellish the surface with beads and stitching, then line the cover panel. I will use wool felt for the pages in which to park the needles. This project will also have to be put on hold for a bit while my arm heals up again. I'm real good at giving advice about being careful not to do too much too soon after surgery or an injury but obviously I'm not so good at taking my own advice!

Saturday, April 4, 2015

First Purples

I've mostly been working on more Sawtooth Stars since my last post (which do not have any purple in them) but I do have some purple blocks I can share for this Scrappy Saturday:


I confess to having made some of these before the onset of April and the announcement of purple as the color of the month for the Rainbow Scrap Challenge. Once I'd begun making these Ohio Stars back in January it was a simple matter to just make another one when a remnant came to hand. I have a few made up in other colors too. We'll see whether they get included in the RSC for this year!

While I was at it I sewed up a pair of Weathervane blocks for the quilts I'll be making for my twin granddaughters. If I'm not mistaken there's at least one pair of bright pink rain boots in that household of four little girls. ;- )


Between the Weathervane blocks are a pair of Wrench blocks in purple prints. All of these purples are looking blue to me right now but maybe they'll be more purple on your computer screen. I'm linking up with the others scrappy quilt makers over at So Scrappy's blog. It's pretty fun to see all the different blocks that scraps are being turned into!

Wednesday, April 1, 2015

No Joke, A New Project!

Regular readers know about my overflowing Parts Department. I recently decided to try to do something about the overabundance of scrappy six inch blocks. I was inspired in part by the Rainbow Scrap Challenge. This year Angela has been giving tutorials for sampler blocks to fit within 12" Sawtooth Star blocks in the color of the month. Why not do the same with my Parts Dept. blocks? For that matter, why not try to use up a color from my stash that I'm no longer so in love with as I once was?

Right now I don't remember which was pulled first, the blocks or the rusty color, but I ended up with a dozen blocks to begin with. Pretty soon I had three stars:


This one began as a Broken Dishes block:


And in this one I simply used a whole cloth square in the middle because the print was so large and strong on its own. Had to make a substitution when it came to the star points though!


With the inclusion of the ships in this star...


I decided that this needed to become a quilt for a boy in foster care. That means it won't have to be as big as the other comfort quilts I've been making and I'll be able to move on to another set of blocks that much sooner!